“Wishing you happiness as big as Ganesh’s appetite
Life as long as his trunk
Trouble as small as his mouse
And moments as sweet as his laddus”

The celebration of the birthday of Lord Ganesh is right around the corner, to be held on September 19, 2012. Preparations are underway for the Ganesh festival and many devotees are opting to make their own, eco-friendly, clay Ganesh statues at home. Ganesh Chathuri, a day filled with public celebrations and home worship, lasts for ten days, and ends with a Ganesh idol immersion. The water immersion ceremony during Chathuri is called Ganesh Visarjana (Sanskrit for ‘departure’). Clay images of Ganesh are ceremoniously dissolved in the ocean or other bodies of water, signifying Ganesh’s withdrawal into all-pervasive consciousness. Hindus believe that Lord Ganesh bestows his presence on earth this day, and worshiping him will bring prosperity, good fortune, and fulfillment of desires.
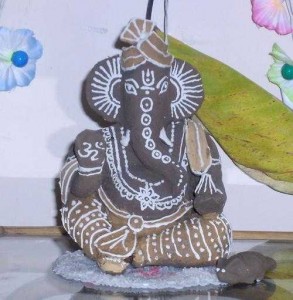
To start a new tradition, with family or friends, create your own clay idol at home. The Ganesh statue does not have to be perfect, just be proud of your idol, enjoy the process and have faith.
“Let all the peace, all the light, all the goodness which the Deity inspires, become part of the parcel of your being.”
Materials Needed:
1. Modeling clay – ready-to-use, moist clay found at any craft store
2. Rolling pin
3. Base for your statue – wooden board is preferred, as it doesn’t stick
4. Exacto knife or sharp-pointed pencil
5. Aluminum foil
6. Paints, glitter, white thread for the poonal or Jandhyam (optional)
Instructions:
1. Separate your clay into sections to represent Ganesh’s body, head, legs, arms, ears and trunk
2. Roll out the largest section of clay into a thin sheet and use it to cover a ball of aluminum foil. This will represent Ganesh’s body and bulbous belly.
3. Roll smaller balls of clay to make his head, ears and trunk. Attach his head to the body – using a lot of water to paste and shape.
4. Make two clay horseshoe-shapes. Use for his legs – cross legs at base of Ganesh for lotus posture. Use another horseshoe-shape to use as arms and attach to body at shoulder level. Form the arms so they adjust at elbows with right angles; the right hand palm turned up.
5. For the ears, make two flat coin-like structures and attach to head.
6. Roll out clay for his trunk and keep it in proportion of his body. The trunk should be wider at top, and narrows down to curve halfway down to his waist. Smooth and add the ‘three patte’ lines on the trunk and forehead with a knife or pencil.
7. To finish, knead, smooth and shape the entire clay idol. Use a Ganesh sculpture or image as a reference guide.
8. Wait until Ganesh is completely dried and paint, use glitter, beads or various accessories.
Please feel free to email photos of your home-made Ganesh clay sculptures to info@lotussculpture.com. Lotus Sculpture would love to share your creations or helpful hints.
